APPLYING MARKINGS
|
By Phil Clark
On virtually all full-size aircraft, there will be markings other than national insignia or registrations. These range from kill and mission markings on war planes, to simple fuel and oil types, jacking points and access / inspection hatches. All of these small details add to the character and realism of the model, but reproducing them by paintbrush is almost impossible.
Applying lettering individually with rub down transfers is possible, but achieving accurate spacing and straight rows of characters is difficult, and can spoil the look if not done well. When it comes to non-letter forms, you are left facing a great deal of masking or a fine brush and a steady hand.
No matter what type of model we build, scale warbird, aerobatic or simple sorts model, the final detailing or trim we apply to the model is what really adds the finishing touch. For this reason, we don’t want to spoil the model by using the wrong method, techniques and materials.
There are several ‘commercially’ available types of decal around, some better then others, some are great for a particular ‘type’ of model, but hopeless on another. What I aim to do here is to go through the various types of decal, how they are applied, and their most suitable applications.
Vinyl
The most commonly found decal is the printed vinyl type. This is basically a thin, clear, self-adhesive film, with the decal screen printed onto the shiny surface. To apply, simply cut out, and apply to the airframe after covering/painting in the same manor as ‘solar trim’. Care must be taken not to get dust, hairs etc…under the decal, as the shiny surface will magnify the smallest imperfection into a BIG one! The best tip I have when applying is to remove say ½ of the paper backing, and position the decal where desired and burnish the edge down. Now, gradually pulling the backing away, slowly burnish the decal down in smooth strokes with a soft cloth, so as not to scratch the surface of the decal. This way, you work from one end of the decal to the other, pushing out any possible air bubbles as you go. If you remove all of the backing in one go, and start burnishing in the middle, you WILL end up with a horrible bubbly mess.
Vinyl decals are excellent for scale ‘non military’ types, where a gloss finish is required. Scale aerobatic models such as CAP’s and Extra’s are suitable subjects. The down sides of all vinyl decals is they have a thickness to them, so you end up with an edge, sitting proud of the airframe surface. Secondly, if you have applied panel lines and rivets etc…. to your surface, applying a vinyl decal will cover up all of this detail. For this reason, a vinyl decal is not really suitable for a war weary fighter or bomber.
Water Slide
Water slide decals are again a screen-printed type, but this time, there is no backing. The decal is built up with a thin layer of water soluble adhesive, then how ever many layers of coloured ink is required to produce the decal, so red, white and blue for a British roundel.
The benefit to this method is the lack of thickness; all you apply to the surface of the model is the coloured ink, attached with a thin layer of adhesive. Application is simple; place the decal on it’s backing paper in warm water, wait until the decal becomes loose ( slides ) on it’s backing, remove from the water, and slide onto the models surface. The decal will happily slide around on the model on a thin layer of water. Once in position, ‘squeegee’ the excess water out using soft tissue and leave alone for the adhesive to set.
I have found water slides excellent for small details such as kill markings, tail codes etc… larger decals can be harder to fit due to the ‘thin‘ nature of the material. The decal can split if you try and slide/pull the decal around too much.
There are 2 downsides to water slides. Firstly, they will again cover up any surface detail you have added. The decal is flexible enough to drop down into panel lines, but rivets will be covered up. Re-applying detail on top of a water slide is not easy, as the decal is quite fragile, and is easily damages, Secondly, they do discolour with age, especially white, this goes a creamy sort of colour…not good!
Water slides are not fuel proof, so you will need to apply a proofer/lacquer over the top to seal the decal down and protect it from every day handling, fuel, oil etc. There are several decal manufacturers around today, many advertising in the model magazines. If you’re looking for a ‘special’ then give them a call, they can make pretty much anything.
Dry-Set
Dry-set or rub on decals are a relatively new thing to scale modelling, but have been around a long time for other purposes. ‘Letraset’, the rub on letters & numbers you can get from art and craft shops use exactly the same principal. Instead of the ink being printed onto the front of a carrier paper like a water slide, the ink is on the back of the carrier film (normally, a slightly opaque plastic film). To apply, position the decal where you require it, and using a smooth hard tool (I find the front edge of an APC prop blade very good), burnish the decal into place. As you rub, you will see the ink ‘detach’ itself from the carrier film, becoming bonded to the model.
|
|
|
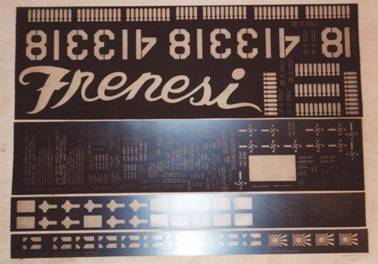
The master image, produced as a negative. |
Once again, there are several companies around who can produce
’custom’ decals to your design/specification; I have used Simon
Young (address below) in
|
|
|
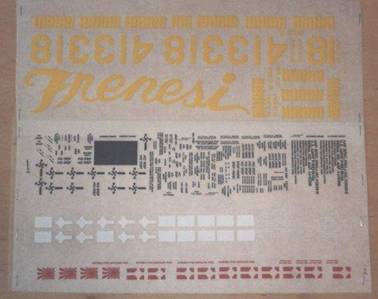
The sheet of rub down markings in the four colours needed for the finished result. |
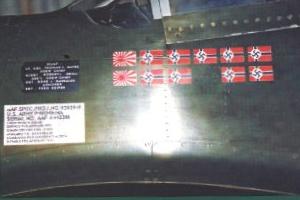
The process for getting decals made is quite simple, a little time spent here will pay off with a good finished result. The one down side of dry-sets it that you can only have a decal of one colour, if you require a decal of several different colours, you will have to make it up from several sections, laying one colour down at a time, starting from lightest to darkest. This is the method I used on the German ‘kill’ markings on the Mustang.
To have dry-sets made, you have to supply the manufacturer with a ‘master’, this is easily done on a home computer and printer. Fonts for ‘Military’ style writing (nomenclature etc…) can be downloaded from the internet, boxes, crosses, squadron codes etc… can all be drawn up on simple 2D CAD systems, and free hand writing (nose art) can be drawn by hand and scanned in. Once the ‘master’ is made (in black), you can specify the colours required. Most manufacturers work with ‘Pantone’ and ‘RAL’ specifications, but if you wish to supply a colour swatch, they can normally work to this as well. To make life easier for the manufacturer, it’s best to group all of the red together, yellow together, black together etc, etc…in strips, don’t scatter then all over the place! From the master, the manufacturer will create a ‘reverse master’ on a clear film…basically a black background with all of the writing etc…showing through clear. It is this ‘reverse master’ that is then used to produce the dry-set marking.
|
|
|
|
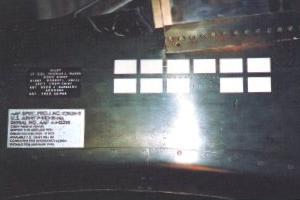
First the white background color is applied |
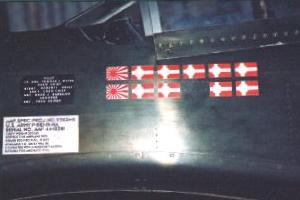
Next comes the red |
I have found dry-sets excellent for the smaller details such as nomenclature, tail codes, kill markings, data panels etc…larger decals are possible but are one, quite expensive to have made, and two, a little tricky to apply. Because the ink is so thin, if you move the carrier film even a small amount during application, the decal is easily split & spoilt. Due to the thickness (or lack of it) of a dry-set, they can be applied over the top of surface detail without hiding it. The ink is quite soft and flexible, and with care, can be burnished down into panel lines and rivets. For small decals that would take hours to apply by hand, dry-sets in my opinion is the way to go, I had an A3 sheet produced for my P-51, using 4 colours, and the cost was around thirty pounds. Application time was only a few hours, so money well spent.
|
|
|
|
Finally the black completes the kill markings |
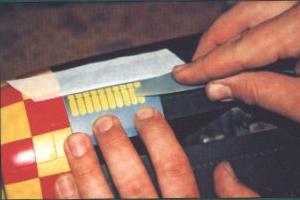
With the carrier film taped in position, the bombs are gentle rubbed down with an old prop blade |
The only other note of caution is the need for sealing the decal down. The decal is fuel proof, but due to the ‘soft’ nature of the ink, normal handling easily damages them. I have always applied a polyurethane clear coat over all dry-sets to seal them down, and protect them from the elements.
Contact:
Simon Young
Tel: - Int + (0) 1293 528677